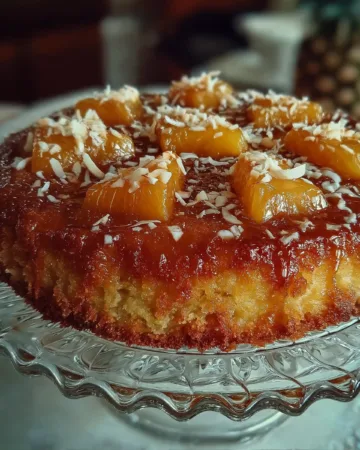


If you’re craving something sweet yet want to keep your sugar intake in check, this Sugar Free Pineapple Upside Down Cake is the perfect dessert for you. This recipe delivers all the classic flavors of caramelized pineapple and soft, moist cake without relying on refined sugar. It’s ideal for anyone watching their sugar levels or simply looking for a lighter dessert that doesn’t compromise on taste. The best part? You can make it in under 40 minutes using everyday pantry staples and natural sugar substitutes that blend beautifully with the tropical essence of pineapple.
This sugar-free version maintains the same comforting richness of the traditional recipe, but it’s crafted with wholesome ingredients like crushed pineapple in its own juice, a gentle balance of spices, and a tender cake base made with sugar alternatives. You’ll enjoy every bite without feeling weighed down or guilty afterward.
Beyond its delightful flavor, this recipe avoids any questionable or non-permissible ingredients, making it suitable for a wide range of eaters in the USA. It uses simple, plant-friendly swaps like butter instead of lard and alcohol-free vanilla alternatives for a clean, naturally flavored finish.
Whether you’re preparing dessert for your family or looking to impress guests, this sugar free pineapple upside down cake will quickly become your go-to treat for guiltless indulgence.
Step-by-Step Guide to Making the Perfect Sugar Free Pineapple Upside Down Cake
Creating this cake from scratch is surprisingly easy, even for beginner bakers. The goal is to achieve a soft, golden sponge that perfectly balances the juicy pineapple topping. Every layer of flavor builds upon the next, so accuracy in your mixing steps ensures a bakery-level result.
Step 1: Prepare the Pineapple Layer
Start by draining 14 ounces of unsweetened crushed pineapple in juice, reserving a quarter cup of the juice for later. Combine the pineapple with ¼ cup of finely chopped pecans, 2 tablespoons of lemon juice, ¼ cup of a sugar substitute (choose a brown-style variety for a caramel-like depth), and 1 teaspoon of cornstarch. Spread this mixture evenly in the base of an 8-inch square or 9-inch round non-stick cake pan. This forms the deliciously juicy foundation that caramelizes while baking.
If you enjoy a little extra visual appeal, you can add maraschino cherry halves before layering the pineapple mixture, although this step is optional. Choose sugar-free cherries if you want to maintain the dessert’s low-sugar integrity.
Step 2: Create the Batter
In a medium mixing bowl, beat together 4 tablespoons of room-temperature butter and ½ cup of sugar substitute until light and creamy. Add 1 egg and mix until the batter turns fluffy. In a separate bowl, whisk 1 cup of cake flour, 1½ teaspoons of baking powder, ½ teaspoon of baking soda, and a blend of spices — ¼ teaspoon each of ground cinnamon and nutmeg, plus ⅛ teaspoon of ground ginger. These warm spices give your cake that irresistible aroma and subtle depth that pairs beautifully with pineapple.
Combine the dry and wet ingredients alternately, adding ⅓ cup of buttermilk, the reserved ¼ cup of pineapple juice, and the remaining 1 tablespoon of lemon juice in stages. This alternating method ensures that the cake stays light, fluffy, and well-aerated without overmixing the batter.
Step 3: Bake to Golden Perfection
Spread the batter evenly over your pineapple mixture. Bake the cake in a preheated oven at 350°F (175°C) for approximately 25 minutes, or until the top is golden brown and a toothpick inserted in the center comes out clean. Immediately invert the cake onto a serving plate so the pineapple topping is displayed beautifully on top. This inversion step is key — it creates the signature glossy fruit layer that defines a pineapple upside down cake.
Step 4: Cool and Serve
Allow the cake to rest for at least 10 minutes before slicing. This cooling time helps the juices settle and ensures the cake maintains its structure. Serve it warm or at room temperature with a dollop of light whipped cream or a scoop of sugar-free vanilla ice cream for a delightful finish.
This recipe serves eight portions, each containing around 167 calories, making it a balanced treat that fits easily into most dietary lifestyles. The cake is satisfying without being heavy, offering the perfect balance of sweetness, fruitiness, and spice.
Equipement
Affiliate Notice: This page contains affiliate links. If you make a purchase through these links, we may receive a commission at no additional cost to you.
To View The Full List of Equipment Tools, Please Go Here ↩

Electric Hand Mixer: Sugar-free fillings require extra mixing power to stay smooth and creamy. A reliable electric hand mixer blends sweeteners evenly, avoids grainy textures, and gives your filling that light, fluffy consistency buyers expect from premium cookies. View On Amazon ↩

This Electric hand mixer : is a powerful yet compact tool that makes mixing, whipping, and beating ingredients quick and effortless. Equipped with multiple speed settings, it gives you full control for everything from delicate batters to thick doughs. The lightweight, ergonomic design ensures comfortable handling, while the durable beaters deliver smooth, consistent results. Perfect for everyday baking and cooking, this mixer saves time and helps you achieve flawless textures with ease. View On Amazon ↩

GIR Oro Seamless Pro-Grade Silicone Spatula: is designed for cooks who demand precision, durability, and hygiene in the kitchen. Its seamless, one-piece silicone construction prevents food buildup, while the heat-resistant material safely handles hot batters, sauces, and melted chocolate. Flexible yet strong, it scrapes bowls clean without scratching cookware, making it an essential tool for baking and everyday cooking. A professional-quality spatula that lasts for years and outperforms cheap alternatives View On Amazon ↩

This Pyrex Glass Measuring Cups Set: is a must-have for accurate cooking and baking, designed to handle both liquid and dry measurements with crystal-clear markings for precision. Made from durable, heat-resistant glass, it’s safe for the microwave, dishwasher, and oven, making prep and cleanup effortless. The sturdy construction resists stains and odors, ensuring long-term reliability. Trusted by generations, Pyrex delivers accuracy and durability every home cook needs for consistently perfect results. View On Amazon ↩

This BEWOS 9-Inch Non-Stick Round Cake Pan Set: is ideal for bakers who want clean layers and professional-looking cakes every time. The premium nonstick coating ensures smooth release without sticking, reducing the need for excess oil or parchment paper. Built with even heat distribution, it prevents undercooked centers and overbrowned edges for consistent results. Designed for durability and ease of use, this pan set from BEWOS is a reliable choice for everyday baking, celebrations, and layered cake recipes. View On Amazon ↩
Tips for Perfect Texture and Flavor Every Time
Achieving that ideal balance of moist crumb and caramelized topping can be easy once you understand the small details that make a big difference. Here are expert-backed tips to ensure your sugar free pineapple upside down cake comes out beautifully each time.
Use Quality Sugar Substitutes
While Equal or similar sweeteners can work, many bakers prefer using alternatives like Monk Fruit Sweetener, Swerve Brown Sugar Replacement, or Truvia Blend for a more natural flavor and better caramelization. These options behave more like sugar when heated, creating that classic glossy pineapple glaze.
Don’t Overmix the Batter
Overmixing introduces too much air into the batter, which can lead to a dense or dry cake. Mix just until the ingredients are incorporated to maintain a soft, tender crumb.
Measure Ingredients Accurately
Small miscalculations can drastically change the texture. For example, too much flour can make the cake dense, while too little can make it collapse. Use a kitchen scale or spoon-and-level technique for precision.
Enhance Pineapple Brightness
If you prefer a more tangy flavor, add an extra half tablespoon of lemon juice or a teaspoon of grated lemon zest to the pineapple mixture. The acidity balances the sweetness and enhances the fruit’s tropical notes.
Let It Cool Properly
Patience pays off. Allow the cake to rest before slicing, as this helps set the pineapple glaze and keeps the layers intact. Rushing this step might cause the topping to slide off or the cake to crumble.
Creative Variations and Flavor Enhancements
The beauty of a Sugar Free Pineapple Upside Down Cake lies in its flexibility. You can experiment with flavors, textures, and toppings while keeping it completely free of refined sugar. Each variation adds its own personality to the classic, letting you create a dessert that feels both familiar and new every time you bake it.
Try a Coconut Twist
For a tropical flair, mix two tablespoons of unsweetened shredded coconut into the pineapple layer. This addition gives the cake a light chewiness and enhances the natural sweetness of the fruit. You can also sprinkle a teaspoon of coconut flakes over the finished cake for a visually appealing touch.
If you prefer a richer flavor, replace part of the buttermilk with coconut milk. It adds a creamy depth that complements the pineapple perfectly while keeping the cake moist. This version is a crowd-pleaser at gatherings and feels like a mini island escape with every bite.
Add a Nutty Crunch
Although the recipe already includes pecans, you can easily swap them for walnuts, almonds, or macadamia nuts for different textures. Toast the nuts before adding them to the pineapple mixture to enhance their natural oils and intensify their flavor. This small step transforms the overall taste from simple to gourmet.
Incorporate Natural Vanilla and Spices
A touch of Simply Organic Pure Madagascar Vanilla Extract brings out the warm undertones in the spices without overpowering the pineapple’s brightness. You can also experiment with small amounts of cardamom, allspice, or clove to create a more aromatic, bakery-style profile.
Make It Gluten-Free or Dairy-Free
If you need to avoid gluten, substitute the cake flour with a 1:1 gluten-free baking mix. For a dairy-free version, use coconut oil or plant-based margarine instead of butter, and replace buttermilk with unsweetened almond milk mixed with one teaspoon of lemon juice. The result remains soft, flavorful, and beautifully golden.
For a Lighter Texture
Fold in two tablespoons of unsweetened applesauce into the batter. This helps retain moisture while reducing the fat content slightly, keeping the cake fluffy and soft even after refrigeration.
Storage, Serving, and Make-Ahead Tips
Proper storage and serving can elevate your sugar free pineapple upside down cake from good to exceptional. Because this dessert contains fruit, it’s important to handle it correctly to maintain its moisture and freshness.
Storage Tips
Once the cake cools completely, store it in an airtight container at room temperature for up to two days. If you plan to keep it longer, refrigerate it for up to five days. The pineapple topping stays moist while the cake remains soft. Before serving refrigerated slices, let them rest at room temperature for about 15 minutes to bring back their natural tenderness.
If you want to prepare it ahead of time for an event, bake the cake as usual, let it cool fully, then cover the entire surface tightly with plastic wrap followed by foil. This double wrap prevents the pineapple juices from seeping out and helps retain flavor. When ready to serve, reheat individual slices in the microwave for 10 to 15 seconds or in the oven at 300°F for 5 minutes.
Freezing Method
To freeze, wrap each slice individually with plastic wrap and then place them in a freezer-safe container. When you crave a piece, thaw it overnight in the refrigerator or for one hour at room temperature. This method makes it easy to enjoy a single serving without defrosting the entire cake.
Serving Ideas
This cake shines on its own, but you can elevate the presentation by serving it with a spoonful of Greek yogurt, light whipped topping, or sugar-free vanilla frozen dessert. A sprinkle of cinnamon or toasted coconut adds visual appeal and a hint of extra flavor.
For a brunch setting, cut the cake into smaller squares and serve it with coffee or tea. The pineapple’s natural acidity pairs wonderfully with warm beverages and light savory sides.
Expert Tricks for Longevity
- Keep the cake away from humid areas, as moisture can make the pineapple topping soggy.
- Always use a non-stick pan or line the base with parchment paper to ensure smooth inversion.
- If your sugar substitute has a cooling aftertaste, add a pinch of salt or a drop of lemon juice to balance the flavor.
- Avoid overbaking; even a few extra minutes can cause dryness. Remove the cake as soon as the center feels springy to the touch.
These careful steps guarantee that your sugar free pineapple upside down cake stays as delightful on day three as it was fresh out of the oven.
Conclusion
This Sugar Free Pineapple Upside Down Cake proves that dessert doesn’t have to rely on refined sugar to taste indulgent. With its caramelized pineapple topping, moist crumb, and gentle blend of warm spices, it brings comfort and tropical brightness together in every bite. The use of sugar alternatives like monk fruit or Swerve gives you sweetness without the guilt, while wholesome ingredients like butter, lemon juice, and buttermilk create a perfectly balanced texture.
This cake is light enough for everyday enjoyment yet special enough to impress your guests. It’s an excellent option for those who want to satisfy their sweet cravings while staying mindful of their diet. Store it easily, customize it to your liking, and serve it warm for an irresistible homemade treat that feels both nostalgic and refreshing.
With just a few simple swaps and a bit of patience, you can transform this timeless classic into a modern, guilt-free dessert that everyone will love. The result is proof that healthy baking can be just as satisfying — and every bit as delicious — as the traditional version.
Print
Sugar Free Pineapple Upside Down Cake
- Total Time: 40 minutes
- Yield: 8 servings
Description
A moist and flavorful sugar free pineapple upside down cake made with crushed pineapple, warm spices, and a light fluffy batter — perfect for a guilt-free dessert that tastes indulgent.
Ingredients
14 ounces unsweetened crushed pineapple in juice, undrained
1/4 cup finely chopped pecans
2 tablespoons lemon juice
1/4 cup brown-style sugar substitute (Monk Fruit or Swerve Brown)
1 teaspoon cornstarch
4 tablespoons butter, at room temperature
1/2 cup sugar substitute (such as Swerve or Truvia Blend)
1 large egg
1 cup cake flour
1 1/2 teaspoons baking powder
1/2 teaspoon baking soda
1/4 teaspoon ground cinnamon
1/4 teaspoon ground nutmeg
1/8 teaspoon ground ginger
1/3 cup buttermilk
Optional: sugar-free maraschino cherry halves
Instructions
1. Drain the pineapple and reserve 1/4 cup of juice.
2. In a bowl, mix pineapple, pecans, 1 tablespoon lemon juice, 1/4 cup sugar substitute, and cornstarch. Spread evenly in the bottom of an 8-inch square or 9-inch round cake pan.
3. In a separate bowl, cream together butter and 1/2 cup sugar substitute until light and fluffy. Add egg and mix well.
4. Combine flour, baking powder, baking soda, cinnamon, nutmeg, and ginger in another bowl.
5. Alternate adding the dry ingredients with buttermilk, reserved pineapple juice, and remaining lemon juice into the creamed butter mixture. Mix until smooth.
6. Spread the batter evenly over the pineapple mixture.
7. Bake in a preheated 350°F (175°C) oven for about 25 minutes or until a toothpick inserted in the center comes out clean.
8. Invert the cake immediately onto a serving plate to reveal the pineapple topping.
9. Let cool for at least 10 minutes before slicing. Serve warm or at room temperature.
Notes
For a tropical variation, add 2 tablespoons of shredded coconut to the pineapple layer.
Use Monk Fruit or Swerve Brown for better caramelization and smoother sweetness.
Store at room temperature for up to 2 days or refrigerate for up to 5 days.
Freeze individual slices by wrapping tightly in plastic and thaw before serving.
Serve with light whipped cream, Greek yogurt, or sugar-free vanilla ice cream.
- Prep Time: 15 minutes
- Cook Time: 25 minutes
- Category: Dessert
- Method: Baking
- Cuisine: American