


Chocolate is loved everywhere, but a simple homemade Dubai chocolate bar takes indulgence to a whole new level. This recipe blends pistachio butter, kataifi pastry, and creamy milk chocolate into a luxurious treat you can make at home. Unlike store-bought chocolate, this dessert is fresh, customizable, and made with ingredients you can trust.
Best of all, you don’t need advanced skills or complicated tools. With just a silicone mold, some pantry staples, and about an hour of your time, you can craft a stunning chocolate bar that looks like it came straight from a high-end sweet shop.
The Dubai chocolate bar has become a symbol of richness and creativity. It combines Middle Eastern flavors like pistachio and tahini with classic European-style chocolate techniques. The result is a layered candy bar that’s crunchy, creamy, and perfectly balanced. Whether you want to impress guests, gift something unique, or simply enjoy a bite of decadence, this recipe is a wonderful choice.
Understanding the Dubai Chocolate Bar
Before jumping into the recipe, it’s important to understand what makes the Dubai chocolate bar special. Unlike standard candy bars, this treat features layers of textures and flavors inspired by Middle Eastern desserts.
The Flavor Profile
The standout taste of this homemade bar comes from the pairing of creamy pistachio butter and nutty tahini with rich milk chocolate. The pistachio provides a buttery sweetness, while the tahini adds a slightly earthy depth. When layered with crispy kataifi pastry, every bite has contrast: smooth and crunchy, sweet and slightly savory, decadent yet balanced.
Milk chocolate forms the base and top layer, which ties everything together. Its natural creaminess complements the nut flavors while allowing the pastry crunch to shine. Some versions include a drizzle of white chocolate colored with green food dye, giving the bar a striking, jewel-like appearance that looks both festive and elegant.
The Role of Kataifi Pastry
Kataifi pastry is shredded phyllo dough that crisps beautifully when lightly toasted in butter or coconut oil. This texture is crucial because it prevents the chocolate bar from being overwhelmingly dense. The pastry brings in a golden crunch that keeps the bar light while still feeling luxurious.
By cooking the pastry until golden brown and mixing it into pistachio butter and tahini, the filling becomes a flavorful, cohesive layer. The result is unlike anything you would find in a standard chocolate bar, and it reflects the unique dessert traditions of the Middle East.
Why Make It at Home
While you can find versions of this chocolate bar in gourmet shops, making it yourself has several advantages. First, you control the quality of ingredients, ensuring everything is fresh and wholesome.
Second, it’s customizable. You can adjust the chocolate type, try dark chocolate instead of milk, or experiment with nut butters like almond or cashew. Third, the process itself is enjoyable. Watching chocolate melt, pastry crisp, and flavors come together is both relaxing and rewarding.
Another benefit is cost. High-end chocolate bars with similar flavor profiles can be expensive, especially if they’re imported or made by luxury brands. By making your own, you get the same experience at a fraction of the price, and you can create multiple bars in one batch.
A Modern Treat with Tradition
The Dubai chocolate bar is a perfect example of fusion cuisine. It combines regional Middle Eastern flavors with modern chocolate-making techniques, giving you the best of both worlds. The pistachio and tahini nod to traditional sweets, while the silky chocolate layers and mold presentation reflect contemporary confectionery trends.
By understanding its roots, you’ll appreciate not just the taste but also the cultural story behind every bite. When you make this bar at home, you’re creating more than candy, you’re crafting an edible experience that connects flavors from different parts of the world into one harmonious dessert.
Print
Simple Homemade Dubai Chocolate Bar Recipe
- Total Time: 56 minutes
- Yield: 2 (6×3-inch) bars, about 14 servings
Description
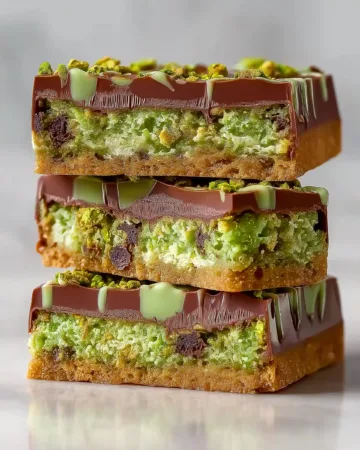
A luxurious simple homemade Dubai chocolate bar layered with toasted kataifi pastry, creamy pistachio butter, and smooth milk chocolate. Perfect for gifting or indulging at home.
Ingredients
3 tablespoons unsalted butter or coconut oil, divided
5 ounces kataifi pastry dough, coarsely chopped (about 2 cups)
1 (7- to 8-ounce) jar creamy pistachio butter or pistachio cream
2 tablespoons tahini
1/4 teaspoon kosher salt
3 tablespoons white chocolate chips (with cocoa butter, such as Guittard)
1 to 4 drops green food coloring (optional)
12 ounces good-quality milk chocolate chips (about 2 cups), divided
Instructions
1. Melt 2 tablespoons butter or coconut oil in a skillet. Toast kataifi pastry until golden brown, 8 to 10 minutes.
2. Stir in pistachio butter, tahini, and salt until combined. Set aside.
3. Prepare rectangular silicone molds on a baking sheet. Drizzle melted white chocolate with optional green coloring for decoration. Freeze.
4. Melt 12 ounces milk chocolate chips with 1 tablespoon butter or coconut oil in a double boiler. Stir until smooth, then add reserved chocolate chips.
5. Spread a thin layer of chocolate in molds. Freeze until set.
6. Add pistachio filling, smoothing into an even layer. Cover with remaining melted chocolate and level with a spatula.
7. Refrigerate until fully set, at least 40 minutes. Remove bars from molds and trim edges if desired.
Notes
Storage: Keep in an airtight container in the refrigerator for up to 3 weeks.
Freezer option: Wrap tightly and freeze for up to 2 months. Thaw in the fridge overnight before serving.
Serving idea: Slice into squares for parties or serve with coffee and tea.
- Prep Time: 15 minutes
- Cook Time: 11 minutes
- Category: Dessert
- Method: No-Bake, Chilling
- Cuisine: Middle Eastern Fusion
Step-by-Step Guide to Making a Simple Homemade Dubai Chocolate Bar
One of the best things about this recipe is how approachable it is. Even if you’ve never worked with pastry dough or silicone molds, you’ll find the process easy once you break it down into steps. Each phase adds a new layer of flavor or texture, and by the end, you’ll have a chocolate bar that looks and tastes professional.
Step 1: Preparing the Kataifi Pastry Base
Start by melting two tablespoons of unsalted butter or coconut oil in a large nonstick skillet over medium heat. Once the butter is melted, add about five ounces of coarsely chopped kataifi pastry dough. Stir occasionally as the strands toast. You’ll notice the pastry turning golden brown and developing a nutty aroma. This step usually takes around 8 to 10 minutes.
As soon as the pastry reaches a golden color, transfer it into a medium bowl. Immediately stir in pistachio butter, tahini, and a touch of kosher salt. These ingredients bind the pastry together and create the luscious filling that will sit between your chocolate layers. The mixture should feel rich and cohesive, almost like a nutty paste studded with crispy threads of pastry.
Step 2: Preparing the Chocolate Molds
While the filling rests, prepare your silicone molds. Place two large rectangular molds (about 8 inches long each) or one extra-large mold on a baking sheet. This makes it easier to move the molds in and out of the freezer or refrigerator without spilling.
If you want to add a decorative touch, melt a small amount of white chocolate using a double boiler. Place a heatproof bowl over a pot of simmering water and stir three tablespoons of white chocolate chips until smooth. Once melted, you can add a few drops of green food coloring. Drizzle this mixture across the bottom of the molds in an abstract pattern. Place the molds in the freezer to let the design set while you prepare the milk chocolate.
Step 3: Melting the Milk Chocolate
Next, take 12 ounces of good-quality milk chocolate chips. Reserve about a quarter cup and set it aside. Place the remaining chocolate chips in the same bowl you used for the white chocolate, along with one tablespoon of unsalted butter. Heat the mixture over simmering water, stirring constantly, until completely smooth. Remove the bowl from the heat and stir in the reserved chocolate chips until they melt from the residual warmth. This technique, known as seeding, helps keep the chocolate glossy and prevents it from becoming dull or chalky.
Pour a thin layer of the melted chocolate into the molds, spreading it evenly across the bottom and sides. Place the molds in the freezer for about 10 minutes to let the chocolate set. This creates the perfect shell to hold the pistachio and kataifi filling.
Step 4: Adding the Filling
Once the chocolate shell is firm, spoon the pistachio cream mixture into the molds. Use the back of a spoon or an offset spatula to gently press the filling into an even layer. Be sure not to overfill, as you’ll need space for the top layer of chocolate. The contrast between the crunchy pastry and creamy chocolate will shine through in this step, so take your time smoothing it out.
Step 5: Sealing the Chocolate Bar
Pour the remaining melted chocolate over the filling, spreading it carefully to cover the surface completely. Use a bench scraper or offset spatula to smooth the top, removing any excess chocolate. The goal is to create a flat, even finish so that your bar looks polished when removed from the mold. Depending on the depth of your mold, you may have some extra chocolate left, which you can save for another dessert.
Refrigerate the bars for at least 40 minutes, or until the chocolate is fully set. Once ready, gently pop them out of the molds. Trim any uneven edges with a sharp knife for a professional presentation. The result should be a glossy, layered chocolate bar with a striking interior of green pistachio cream and golden pastry.
Step 6: Storing and Serving
These bars are best stored in an airtight container in the refrigerator. They can last up to three weeks, though chances are they’ll be gone long before that. When serving, cut them into smaller squares or enjoy them as full bars. Each bite offers a perfect balance of crunch, cream, and chocolate indulgence.
This simple homemade Dubai chocolate bar recipe shows that luxury doesn’t have to be complicated. With just a handful of ingredients and a little patience, you can create something extraordinary in your own kitchen.
Tips, Variations, and Ingredient Alternatives
Making a simple homemade Dubai chocolate bar is already exciting, but with a few smart adjustments, you can tailor the recipe to your taste, dietary needs, or creative flair. Whether you prefer dark chocolate, want a vegan version, or enjoy experimenting with flavors, there’s plenty of room to adapt.
Chocolate Options
The recipe traditionally uses milk chocolate, which delivers a creamy sweetness that balances the nutty filling. But you can switch things up depending on your preference:
- Dark chocolate: Perfect for those who love bold flavors. It adds a slightly bitter note that contrasts beautifully with the pistachio cream and kataifi pastry.
- White chocolate: If you’re looking for a sweeter, milder option, use white chocolate as the main shell instead of just the drizzle. It makes the bar rich and indulgent, with a velvety finish.
- Blended chocolate: Try combining milk and dark chocolate layers for a more complex flavor profile. This works especially well if you want to reduce the sweetness without losing creaminess.
Nut Butter Substitutions
Pistachio butter gives the chocolate bar its signature Middle Eastern flavor, but it can be swapped with other nut butters if needed:
- Almond butter: Adds a subtle sweetness with a smooth texture.
- Cashew butter: Creamy and mild, this pairs well with both milk and dark chocolate.
- Hazelnut butter: Brings a more decadent, dessert-like feel, similar to praline.
If you want to keep the flavor authentic, pistachio butter remains the top choice, but experimenting with different nut bases can create a new twist every time.
Pastry and Crunch Variations
Kataifi pastry is unique for its fine, shredded texture that toasts beautifully. If you can’t find it, you can substitute with other crunchy bases:
- Crushed phyllo sheets: Bake or toast phyllo dough, then crumble it for a similar texture.
- Cornflakes or rice crisps: For a more accessible option, these give a satisfying crunch without changing the flavor dramatically.
- Shredded coconut: Toasted coconut adds both crunch and a hint of tropical sweetness, pairing nicely with pistachio.
Each option brings a slightly different texture, but all work well within the chocolate mold.
Flavor Enhancements
If you want to take your Dubai chocolate bar up a notch, try these flavor boosters:
- Alcohol-free vanilla flavor: Brands like Simply Organic or Watkins Clear Vanilla Flavor are excellent options to enhance sweetness without overpowering the nuts.
- Cardamom: A pinch of ground cardamom adds warmth and a distinctly Middle Eastern aroma.
- Orange zest: Freshly grated zest brings brightness that cuts through the richness.
- Sea salt flakes: Sprinkling a touch of flaky salt on top before the final chill enhances the chocolate’s depth and balances the sweetness.
Vegan and Dairy-Free Options
This recipe can easily be adapted for those avoiding dairy:
- Use coconut oil instead of butter when toasting the pastry and melting the chocolate.
- Choose dairy-free chocolate chips that still contain cocoa butter for smooth melting.
- Opt for plant-based nut butters and make sure any added tahini is pure sesame without dairy blends.
The result is just as indulgent, with all the layers of crunch and creaminess intact.
Presentation Ideas
Part of the appeal of this dessert lies in how it looks. For a professional finish:
- Marbled effect: Drizzle dark chocolate over milk chocolate for a striking two-tone pattern.
- Nut garnish: Sprinkle finely chopped pistachios on top of the bars before chilling.
- Gift-ready packaging: Wrap each bar in parchment and tie with twine for a homemade but elegant presentation.
These finishing touches make the bars perfect not only for personal enjoyment but also for sharing or gifting.
By trying out different ingredients, flavor additions, and presentations, you’ll keep this recipe exciting every time you make it. The foundation stays the same, but the possibilities are endless.
Storage, Shelf Life, and Serving Suggestions
Making your own chocolate bars at home is rewarding, but knowing how to store and serve them correctly ensures they taste just as good days or weeks later. Since these bars contain delicate pastry and nut butter, proper storage keeps them fresh, flavorful, and safe to enjoy.
Storage Tips
Chocolate is sensitive to both temperature and moisture. If stored incorrectly, it can develop a dull appearance or even separate into unappetizing textures. To keep your Dubai chocolate bar at its best:
- Refrigerator storage: Place the bars in an airtight container and refrigerate for up to three weeks. This prevents the nut filling from spoiling and keeps the chocolate firm.
- Avoid moisture: Always line the container with parchment paper to prevent condensation from affecting the chocolate surface.
- Freezing option: For longer storage, you can freeze the bars for up to two months. Wrap each bar tightly in parchment or foil, then place it in a freezer-safe container. When ready to eat, let the bar thaw in the refrigerator overnight to preserve its texture.
Shelf Life Considerations
Because the filling contains toasted pastry and nut butter, the shelf life is slightly shorter than plain chocolate bars. However, with proper refrigeration, you’ll enjoy up to three weeks of quality. Beyond this, the pastry may lose its crunch, and the flavors may not taste as fresh.
When stored correctly, the chocolate should remain glossy and smooth without developing white streaks or spots, known as bloom. If you notice bloom, it doesn’t mean the chocolate has gone bad, but it can affect texture and appearance.
Serving Suggestions
The beauty of this chocolate bar is its versatility. It can be served in many ways, from casual snacks to impressive desserts. Here are a few ideas:
- As whole bars: The classic way is to enjoy them as they are, cut into neat rectangular portions.
- Bite-sized squares: Slice the bars into smaller pieces for easy serving at gatherings. These mini versions are perfect for a dessert platter.
- With coffee or tea: The nutty filling pairs wonderfully with espresso, cappuccino, or mint tea, creating a café-style indulgence at home.
- Topped on ice cream: Break the bars into chunks and sprinkle them over vanilla or pistachio ice cream for an extra layer of crunch and flavor.
- Paired with fruit: Serve alongside fresh strawberries, raspberries, or orange slices for a refreshing contrast.
Gifting Ideas
Because of its elegant look and luxurious flavors, this chocolate bar makes a thoughtful homemade gift. Wrap each bar in parchment, then add a ribbon or small decorative box. It’s a creative way to show appreciation without relying on store-bought sweets.
The key is that these bars are versatile, delicious, and easy to share. Whether you’re enjoying them as a personal treat, serving them at a dinner party, or gifting them to someone special, the simple homemade Dubai chocolate bar always delivers a touch of elegance.
Nutritional Insights and Health Benefits
While the simple homemade Dubai chocolate bar is an indulgent treat, it also brings a surprising number of nutritional benefits when enjoyed in moderation. By understanding the key ingredients, you can appreciate not just the flavor but also the nourishment that comes with each bite.
Calorie and Macronutrient Breakdown
Each serving of this chocolate bar contains about 299 calories, making it a satisfying snack or dessert portion. The fat content sits at around 19.8 grams, primarily from cocoa butter, pistachios, and tahini. These fats are not only responsible for the silky texture but also provide essential energy for the body. Carbohydrates total roughly 27.6 grams, with natural sugars from chocolate and nut butter offering quick fuel. A modest 3.3 grams of protein rounds out the bar, mainly from nuts and sesame.
Healthy Fats
The bar may feel indulgent, but many of its fats are the healthy kind. Pistachio butter and tahini are both excellent sources of unsaturated fats, which support heart health and help regulate cholesterol levels. Coconut oil, if used, provides medium-chain triglycerides that are easily digested and converted into energy. Even the cocoa butter in chocolate contributes to a smooth, satiating texture while offering stearic acid, a fat known to have a neutral effect on cholesterol.
Nutrient-Rich Ingredients
Several of the ingredients provide more than just taste.
- Pistachios: Packed with antioxidants, protein, and fiber, pistachios are known for supporting heart health and aiding digestion.
- Tahini (sesame paste): A source of calcium, magnesium, and iron, tahini helps support bone strength and energy production.
- Chocolate: Especially dark varieties, contains flavonoids that may improve blood flow and promote brain health.
- Kataifi pastry: Though primarily for texture, the toasty crunch adds variety without overwhelming the nutritional profile.
Dietary Benefits
This chocolate bar also suits a variety of dietary needs:
- Peanut-free: Since the base uses pistachio and sesame, it’s a great option for those avoiding peanuts.
- Vegetarian-friendly: Every ingredient fits comfortably within a vegetarian diet.
- Flexible for dairy-free diets: By substituting butter with coconut oil and using dairy-free chocolate, the recipe easily adapts for those avoiding lactose.
Moderation and Enjoyment
Of course, this is still a dessert. The sugars and saturated fats make it best enjoyed in moderation. Think of it as a luxurious treat rather than an everyday snack. Having a small square after a meal or with coffee lets you savor its richness without overindulgence.
Balancing Indulgence with Wellness
The key to enjoying the Dubai chocolate bar lies in balance. Because it’s homemade, you can control portion sizes and ingredients. Using high-quality chocolate, natural pistachio butter, and pure tahini ensures a dessert that feels indulgent while still delivering nutrients. Compared to processed candy bars that often contain artificial flavors, preservatives, and excess sugar, this homemade version offers a far cleaner and more wholesome option.
By blending indulgence with nutrition, the simple homemade Dubai chocolate bar represents how dessert doesn’t have to mean empty calories. Instead, it’s a thoughtful creation that satisfies both cravings and wellness goals.
Conclusion: Crafting the Perfect Simple Homemade Dubai Chocolate Bar
The simple homemade Dubai chocolate bar is more than just a dessert, it’s a blend of tradition, creativity, and indulgence. From the crunch of kataifi pastry to the creaminess of pistachio butter and the richness of smooth chocolate, every layer works together to create a treat that feels both luxurious and approachable. Unlike store-bought bars, this homemade version gives you full control over the ingredients, ensuring freshness and quality in every bite.
We explored how the flavors of pistachio, tahini, and chocolate combine to create a unique profile, learned step-by-step how to prepare the bar at home, and discovered tips for customizing it with different chocolates, nut butters, and finishes. Storage advice and serving ideas showed how to keep the bars fresh and versatile, while nutritional insights revealed the benefits hidden in this indulgent sweet.
What makes this recipe special is its balance between indulgence and thoughtfulness. It isn’t just candy, it’s a handcrafted dessert that captures the essence of gourmet chocolate-making in your own kitchen. Whether you’re enjoying it as a personal treat, sharing it with friends, or presenting it as a thoughtful gift, this chocolate bar delivers satisfaction every time.